
Which radio to get should be one of your biggest considerations. If you purchased an RTF airplane, this choice has probably already been made for you, but if not, you’ll need to purchase one separately. Let’s take a look at some things you should know.

Most of the time, the RTF (Ready-To-Fly) RC planes come with a radio, so you don’t necessarily have to go through the process and buy the radio on its own. However, it’s still good to know the basics of the “radio” in the RC hobby and know what the different number of channels are for. When you get further in your radio-controlled airplane hobby, you’ll be looking for a more advanced RC radio transmitter, so I’ll tell you why you should consider getting a better radio than you’d actually need right at the beginning. And we’ll go through the basics of RC radio controls and channels in the process.
What do you need?
Contents
The most basic radio control transmitters have 2-3 channels, rudder or aileron, throttle & steering, or rudder & aileron in the case of RC airplanes. It takes 4 channels to gain complete acrobatic capability that will enable you to fly nearly every radio-controlled plane.
Because of this, it might be worth it to buy a bit more expensive and better radio with at least 4 channels, even for your first plane, because you can “re-use” the same radio for your next RC plane, heck, you can use the same radio for RC cars and boats as well, and possibly even radio-controlled helicopters.
Like said, the 2-3 channel RC radio transmitter will do fine at the beginning, but you will probably have to buy a better one at some point when you’ve built up your skill and want to move to the more advanced models and want to get full acrobatic control of your radio controlled plane.
So, I recommend starting out with a basic, 4-channel radio like the one pictured below (more on that later).
Channels vs. Channels
rc plane transmitter
rc plane transmitter and receiver
rc airplane transmitter
best rc transmitter for planes
best rc plane transmitter
In the world of RC flying, the word “Channels” has two meanings. Let’s identify them now to avoid confusion later.
In the case of a “4-Channel” radio, the word “Channels” refers to how many separate items you can control on a single airplane. The four basic controls are Elevators, Ailerons, Rudder, and Throttle – That’s 4 items, hence you will need a 4-channel radio. If you wanted to add extras to your plane, like Flaps and Retractable Landing Gear, you would need two more channels, so in that case, you would need a 6-channel radio. When you have more than 6 control channels, you’ll have the option to add cool extra features like parachute drops, bombs, dive brakes, or other operating parts to your model. Some radios feature up to 12 of them, but the more channels you have, the more expensive the radio will be.
Here’s what you get with a different number of channels in your RC radio transmitter:
- 1 Control Channel: rudder* (e.g. RC model plane flies with full throttle until out of fuel/power)
- 2 Control Channels: throttle, steering (e.g. RC cars, RC boats). or Rudder & Elevator (e.g. Glider RC airplanes)
- 3 Channels: rudder or aileron, elevator, throttle or rudder, aileron and elevator
- 4 Channels: rudder, aileron, elevator, throttle.
- 5 Channels: rudder, aileron, elevator, throttle, flaps, or retracts.
- 6 Channels: rudder, aileron, elevator, throttle, flaps, or retracts.
The other definition of “Channels” is like the channels on your television set. In the USA, the FCC allows us to use certain radio frequencies in the 72MHz range. These frequencies are divided into sections and designated channels 11 through 60. So if your radio is broadcasting on Channel 52, it is perfectly safe to fly with someone whose radio is on channel 38 and so on. But two people who are on the same channel cannot fly together. In fact, if “Joe” is flying and “Bill” turns on a transmitter, which is on the same frequency, “Joe” will lose control of his plane – which usually leads to a crash – which usually leads “Joe” placing “Bill’s” transmitter in a place where only his proctologist can get it back for him. Clubs have methods of frequency control to prevent this, which is another good reason to join a club!

72MHz or 2.4GHz?
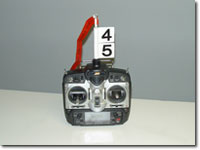 This is a 6-channel radio on Channel 45
Here’s your next consideration. In recent years there has been a huge breakthrough in radios. Many of the big-name companies are coming out with radios that broadcast in the 2.4GHz range. This is the area of the radio spectrum where cell phones operate. They are just as good as the 72MHz radios and they have one big advantage – No More Channel Numbers! You don’t have to worry about “Who’s flying on what channel” anymore. You can turn your radio on and off at the field without worrying that you might “Shoot someone down”.
We both have them and they are GREAT! The only bad thing is – yup, you guessed it – they’re more expensive. But if you’re money is burning a hole in your pocket, this is one way I would recommend spending it. For a computerized 6-channel, 2.4 Gig system, you’re looking at a price tag of about $250, but you get a lot of bang for your buck. Now, there ARE less expensive 2.4 systems on the market, but this is one of those areas where you get what you paid for. Many 2.4 systems are strictly for “Park Fliers” and have a limited range, so ask around before buying!
So, How Many Channels Should I get?
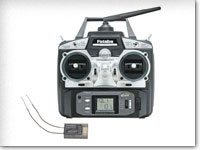
This is entirely up to you and your budget. However, we strongly recommend starting with no more than a basic 4-channel radio (About $120). The reasons for this are many, but mainly because first and foremost, you need to learn how to fly. We have seen countless beginners get so confused with all of the “Bells & Whistles” of an advanced radio that they lose sight of their basic objective – Learning to fly!
Here are features that you should look for in your first radio:
- At least 4-channels
- Trainer Cord (Buddy Box) Capability
- Servo Reversing
To summarize, if you’re new to radio-controlled airplanes, that 2 channel radio for your RC glider plane or the 3 channel basic radio coming with your RTF RC plane will do just fine. But if you’re seriously thinking about going into RC airplanes hobby, consider getting yourself a radio with at least 4 channels.
You know how it goes, when the RC bug bites, you’ll be looking for high-quality gear. And a metallic, chrome-style RC radio transmitter feels so much better than the usual plastic models, adding a sense of quality and luxury to the hobby you love
What Is a Buddy Box?
“Buddy Box” is a feature that came out several years ago which was one of the major improvements in-flight instruction. It is a system where you can link your transmitter to a second transmitter via a cord plugged into the back. Your instructor will use YOUR transmitter and you will use the second transmitter (a.k.a. “Buddy Box”). The Buddy Box can be anything from your instructor’s $800 transmitter to a simple $20 plastic box that is shaped like a transmitter, that only works when plugged into another radio, but in either case, the principle is the same.
After you have had your “Ground School”, where your instructor will look your plane over for mistakes and tell you some of the basics, he will then take off and bring your plane to a safe altitude. At this point he will probably show you a few things regarding how much stick movement is needed for each turn, etc. and then, he will hold a switch in his (Your) transmitter which turns control over to the buddy box.
Now YOU are flying the plane!
If you get in trouble (Which usually happens within the first 30 seconds), the instructor simply lets go of the switch and takes over. Once your heart rate goes back down below that of a gerbil, he’ll let you take over again. You will repeat this process until you solo – which is usually in one season, but depending on the individual, could take a few years.
Servo Reversing:
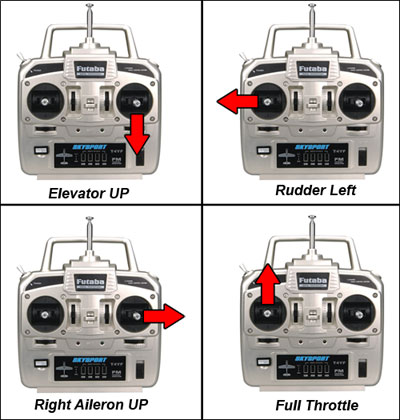 USA Standard Mode 2 Transmitter
Servo Reversing is a very nice feature that allows you to reverse the direction in which a servo turns. The servos turn a wheel or arm that is connected to its control surface with a pushrod. When you move the right stick on the transmitter BACK, the elevator should move UP, move the right stick to the RIGHT, and the right aileron should go UP (Left aileron down). When you move the left stick to the left or right, the rudder will move to the left or right correspondingly, and pushing the left stick FORWARD will advance the throttle. If you move the stick and the corresponding surface moves the wrong way, you need to reverse its movement. It is often easy to just connect the pushrod to the other side of the servo wheel or arm, but many times it is not. So having the ability to reverse the direction of the servo is a very nice option.
(Note: some people tend to think that the elevator stick works opposite to the way it should – you can see in the picture above that pulling the stick “DOWN” makes the elevator go “UP”. However, when you have the Tx in your hand, you hold it level with the ground, so the stick no longer moves “Up & Down” but rather it moves “Forward & Back”. It also works exactly the same as the “Stick” on many Full-Scale airplanes – Pull back to go up, forward to go down, and right & left to bank the plane with the ailerons.)
Dual Rates
Many basic radios also have a feature called “Dual Rates” but we strongly recommend not using them – In fact, you should adjust them so that even if the switch is accidentally turned on it will not affect the controls. Dual Rates is a feature (usually activated by switches on the Transmitter) that will reduce the amount of movement of the control surfaces. This is to make the plane less sensitive at certain times. Personally, I could never understand why you would ever want less control. While it’s true that having less-sensitive controls can make for less “jerky” movements at critical times (Like landings), it is also true that if you get in trouble you won’t have full control. It’s sort of like driving down the highway in handcuffs. Sure, as long as you’re on a straight highway it’s no problem, but if you suddenly have to avoid an accident, you’re in big trouble.
I have also seen MANY crashes occur because someone tried to do a loop or a roll and forgot to turn their dual rates off – or didn’t realize that they were on.
Dual Rates can come in handy for more advanced flying – like for some of the new “3-D” type of flying, but you’re a long way from doing that kind of stuff. So for starters, avoid the Bells and Whistles. If, like some people, you are overcome with a desire to buy more radio than you need, you could get a 6-channel computer radio so that you can have some of those fancy features later, but don’t start playing with them now – You will have enough to learn before you’re ready for that.
What Brand Should I Get?
The four top-selling brands in the USA are: (In alphabetical order)
- Airtronics
- Futaba
- HiTec
- JR
Of these, you’ll find that Futaba and JR are the two most popular. They are all excellent radios, and many of their components are interchangeable with the other brands. So which one is right for you? If you plan to fly with a Club (Which we HIGHLY recommend) ask around at the field. You’ll want to be sure that your radio is compatible with your instructor’s radio so that you can use the “Buddy Box” feature.
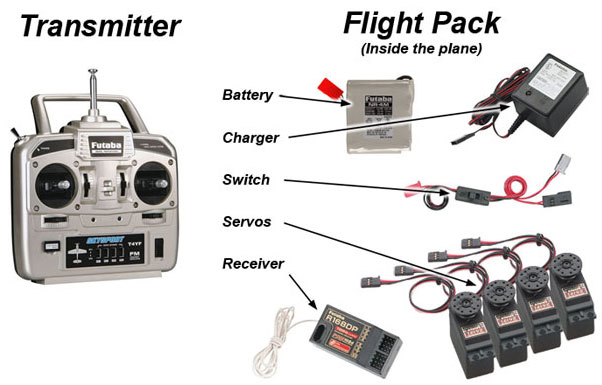
I’ve Purchased My New Radio. Now, What Goes Where?
- The typical components of a radio are:
- Transmitter (Control Box)
- Receiver
- Battery Pack
- Switch
- Servos
- Aileron Extension
If it’s a 72MHz system, there will also be a few accessories included, like a red flag and channel number (See picture above). This time, “Channel” is referring to your frequency. Both of these items attach to the antenna on your transmitter (Please note: “Transmitter” is the preferred term. If you call it a “Control Box” you may get laughed off the field. Some people also refer to their transmitter as their “Radio”. This is not as bad as “control box” but still incorrect).
The first thing you should do with a new radio is to put it on charge. The charger that came with it has two plugs. One plug goes right into the side or back of the Transmitter (Tx) and the Receiver (Rx) battery pack will plug into the other. Now plug the charger into the wall and leave it there for 16 hours. Don’t worry about the time involved, you’ll still have lots of other radio stuff to play with for now, mainly – Servos!
Servos
The servos are the little motors that do the actual work of moving the controls. They have an output shaft on top which has a wheel or arm connected to it. I usually remove the wheels and replace them with one of the 6-point or 4-point arms for a little extra movement, but the choice is yours.
The next thing you want to do is to install the mounting grommets. These are the little rubber pieces that act as shock absorbers in the mounting holes. There are several different types, so refer to your manual for installing them, but the one thing I want to point out is that the brass eyelet goes in from the bottom side, not the top and it is easiest to install by sliding it over a small jeweler’s screwdriver and pushing the screwdriver through the hole.
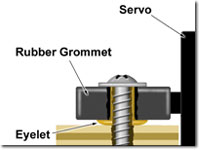 This is the proper way to install brass eyelets
Using the screws provided, screw each servo to the servo tray. Tighten the screws just enough to slightly distort the rubber on each of the grommets.
Receiver
Once the servos are installed, it’s time to plug them into the receiver (Rx). The Rx will have a slot for each channel and one for the battery. Some manufacturers print what each channel is for right on the Rx, while others just number them and although it may vary in some cases, the usual order is:
- Channel 1 = Ailerons
- Channel 2 = Elevator
- Channel 3 = Throttle
- Channel 4 = Rudder
The next thing worth noting is the Aileron Extension Cord. While the servos for the rudder, throttle and elevator are usually mounted in the fuselage, the aileron servo mounts in the wing. And since the wing needs to be removed from time to time, the aileron servo is often getting plugged in and unplugged. AND since the Rx is often buried in a pile of foam rubber, it can be difficult to access. So it’s a good idea to plug a short extension into the aileron channel on the Rx which will be easily accessible.
Finally, there is one slot on the Rx marked for the Battery. Actually, this is where the switch will plug in. The switch usually has one female connector coming from one side and a male and female connector coming from the other side. The female connector on the single side goes to the Rx, the male connector is where the battery plugs in and the second female connector is to plug the charger into. (Note: The switches on both the Rx and the Tx are designed in such a way that if they are “ON”, the charger will not charge them. The charger has an LED for the Rx and one for the Tx. Both LEDs should be lit when charging both batteries.)
Thanks for the clear, simple explanations of all the RC electronics. I regret that I am still stuck when it comes to the different “systems’ used by various manufacturers of Tx’s. There seems to be a set of numbers and letters denoting a brand specific aspect to these radio transmitters. Does that mean that if I buy a Brand X transmitter, it will only operate with Brand X receivers, electronic speed controllers, servos and telemetry? I have looked through several guides and can’t seem to find this explained. Please help.
Thanks for the article!
I’m looking at starting out in RC model flying, just on my laptop in a simulator initially, so it was great hearing about some useful tips to consider when buying a transmitter.
Thank you very much for your comment! We are glad you’ve found our guide helpful.